Dissertation Formatting in Microsoft Word
This month, we will go over some tips and tricks with formatting your dissertation in Microsoft Word. Although every university and journal’s style and formatting guidelines are different, there are common formatting options that every student should know and understand, including (a) formatting the font style and paragraph spacing, (b) changing the margins of the document, and (c) inserting a Table.
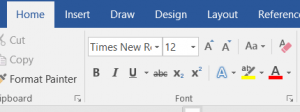
Font Style and Paragraph Spacing: Per APA and scholarly writing, use Times New Roman font, size 12, and double space the text. At the top of the MS Word document, select the “Home” tab and view the “Font” section to find the current font style, size, and spacing. You can use the drop-down arrows to the right of the style and size options to change your font, if needed. In addition, at the bottom right corner of this pane, there should be a small corner symbol with an arrow pointing down and to the right. If you click on this icon, MS Word will display a larger Font style box with additional font options.

Need Help with your Analysis ?
Schedule a time to speak with an expert using the link below.
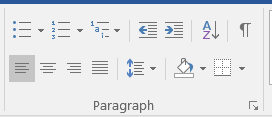
For the spacing of your font between sentences and within each paragraph, the “Paragraph” section to the right of the “Font” section includes options to format your text relevant to the whole paragraph. The icon specific for spacing between sentences looks like an up-and-down arrow with 5 lines to the right of the arrow (located in the middle of the bottom row of icons; see image below). To select double spaced font, choose the 2.0 options; alternately, for single-spaced font, select the 1.0 option. Again, there is an icon at the bottom right corner with an arrow pointing down and to the right, which you can select to open a larger Paragraph options pane.

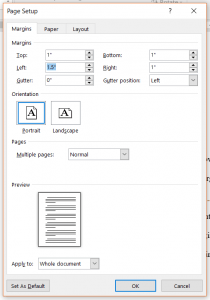
Margins: To change the margins of your document, move over to the “Layout” tab at the top of the MS Word document. The first item should be titled “Margins.” Select the drop-down arrow and choose “Custom Margins…” at the bottom of the options. In this pane, you can use the up/down arrows to change the margin size, or you can type into the box before the ” symbol to apply a specific margin. Generally, APA documents are 1” margins all around (right, left, top, and bottom); however, many schools require a 1.5” left margin for binding purposes once your dissertation is completed.

Inserting a Table: If you are going to include a table in your dissertation, always, always, always, use the MS Word Table feature. Do not include an image of a table. Do not copy and paste a software output table (because you will need to recreate the entire table to comply with APA requirements), and DO NOT manually hit the tab or space buttons on the keyboard to try to create a table. These options in the “do not” list lead to formatting nightmares that may throw off the formatting of the entire document or hold you back in the dissertation process.
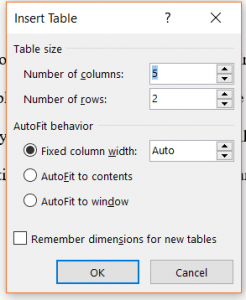
To properly insert a table, go to the “Insert” tab at the top of the Word document. Click on the table icon, under “Tables,” and use the drop-down arrow to select the number of rows and columns you will need for your table data. Alternately, you can choose “Insert Tables…” in the Table options drop-down menu and manually enter the number of rows and columns.

After you have inserted your table and added your table data, make sure to only include horizontal borders at the top and bottom of the table, and under the main table headings. For more specific APA rules regarding how to format a table, see APA6, Section 5, Displaying Results (p. 125).